Arrange clips in the timeline in Final Cut Pro for Mac
In Final Cut Pro, you can arrange and reorder the clips in your project however you want. If you add or move a clip in the timeline by dragging, Final Cut Pro moves other clips to make room for it. Other reordering techniques include moving clips numerically by entering a timecode value, nudging clips with keyboard shortcuts, overwriting with the Position tool, and moving clips vertically from and to the primary storyline.
Move clips by dragging horizontally
In the Final Cut Pro timeline, select one or more clips.
Drag the clips to a new location in the project.
As you drag your clips, you see an outline of your selection at the new position in the timeline. When you release the clip, the repositioned clip (or clips) appears at the new location. Final Cut Pro ripples clips (and any connected clips) in the timeline to make room for the repositioned clips and to close the gap left by the clips that were repositioned. You can also drag clips vertically in and out of the primary storyline.

Move clips horizontally or vertically with menu commands and keyboard shortcuts
You can use menu commands and keyboard shortcuts to move clips forward or back in the timeline, or move connected clips up or down.
Move clips horizontally: Select one or more adjacent clips in the primary storyline or a connected storyline, then do any of the following:
Choose Edit > Move > Move Left (or press Option-Left Arrow).
Choose Edit > Move > Move Right (or press Option-Right Arrow).
Final Cut Pro ripples clips (and any connected clips) in the timeline to make room for the repositioned clips and to close the gap left by the clips that were repositioned. See Move clips by dragging horizontally, above.
Move connected clips vertically: In the timeline, select one or more connected clips that overlap with other connected clips, then do any of the following:
Choose Edit > Move > Move Up (or press Option-Up Arrow).
Choose Edit > Move > Move Down (or press Option-Down Arrow).
The connected clip swaps places vertically with the overlapping connected clip.
Nudge clips with keyboard shortcuts
You can “nudge” selected items to move them by very small amounts, such as frames. Nudging by subframes is also available for connected audio-only clips.
Nudging clips in the timeline is similar to making a slide edit; the preceding clip and the following clip must have media handles (additional media available beyond the edit point). See Make slide edits.
In Final Cut Pro, select one or more clips in the timeline.
To nudge the clips, do any of the following:
Move the selection left by one frame: Press Comma (,).
Move the selection left by 10 frames: Press Shift-Comma (,).
Move the selection right by one frame: Press Period (.).
Move the selection right by 10 frames: Press Shift-Period (.).
If you want to nudge connected audio clips by one or more subframes, do any of the following:
Move the selection left by one subframe: Press Option-Comma (,).
Move the selection left by 10 subframes: Press Option-Shift-Comma (,).
Move the selection right by one subframe: Press Option-Period (.).
Move the selection right by 10 subframes: Press Option-Shift-Period (.).
For more information about subframes, see Zoom in to audio waveforms.
The nudged clip appears at the new position in the timeline. The adjacent clips are trimmed to accommodate the change in the clip’s position. If you prefer to fill in the vacated parts of the storyline with a gap clip, select the Position tool by pressing P before nudging clips.
Move clips by entering a timecode value
You can move selected clips in the timeline by entering an amount of time you want the clips to move.
Moving clips by entering a timecode value is similar to making a slide edit; the preceding clip and the following clip must have media handles (additional media available beyond the edit point). See Make slide edits.
In Final Cut Pro, select one or more clips in the timeline.
Do any of the following:
Move the clips forward: Press the Plus Sign (+) key, then type a timecode duration for the move.
Move the clips back: Press the Minus Sign (–) key, then type a timecode duration for the move.
Note: For more information and tips on entering timecode, see Navigate using timecode.
The timecode display below the viewer becomes an entry field and reflects your changes as you type.

Press Return.
The clips move forward or back by the duration you entered. The adjacent clips are trimmed to accommodate the change in the clip’s position. If you prefer to fill in the vacated parts of the storyline with a gap clip, select the Position tool by pressing P before entering a timecode value.

Overwrite clips using the Position tool
You can move clips by dragging them in the timeline to overwrite other clips. This allows you to place clips precisely without causing other clips to move to make room.
In Final Cut Pro, click the Tools pop-up menu in the top-left corner of the timeline and choose Position (or press P).
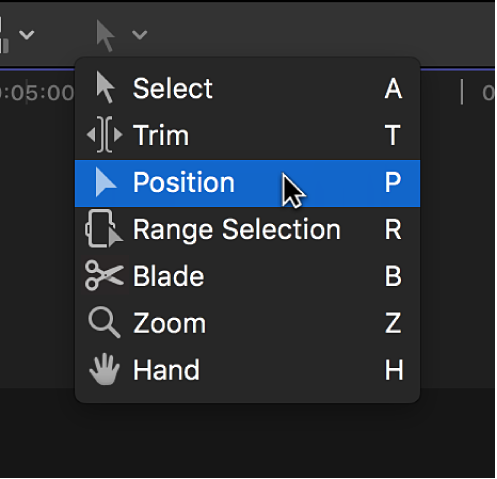
The pointer changes to the Position tool
 .
.Tip: To switch to the Position tool temporarily, hold down the P key. When you release the P key, the tool reverts to the previously active tool.
Select the clip you want to move.

Drag the clip to a new position in the timeline.

The moved clip overwrites any clips at the new position. A gap clip fills in the vacated part of the timeline.
Note: If you prefer to move clips left or right in the timeline without leaving a gap, you can perform a slide edit.
To return to the Select tool (the default), click the Tools pop-up menu in the top-left corner of the timeline and choose Select (or press A).
Drag clips from and to the primary storyline
Dragging clips from and to the primary storyline causes ripple edits, which affect the total duration of your project. When you move a clip out of the primary storyline, it becomes either an individual connected clip or part of a connected storyline.
In Final Cut Pro, if the Select tool is not the active tool, click the Tools pop-up menu in the top-left corner of the timeline and choose Select (or press A).

Select one or more clips (either clips in the primary storyline or connected clips).
Do any of the following:
Move clips out of the primary storyline: Drag the clips from the primary storyline to their new position as connected clips (above or below the primary storyline).
The subsequent clips in the primary storyline ripple left to close the gap created by the clips you moved.

Move clips to the primary storyline: Drag the clips from their position as connected clips to an edit point between two clips in the primary storyline.
The result is effectively an insert edit: The former connected clips are inserted in the primary storyline, and subsequent clips ripple right to make room for the new clips.

Note: You can drag clips from and to the primary storyline as long as there are no clips connected to them. If there’s a connected clip, you must first move or remove it, or use either the Lift from Storyline command (Option-Command-Up Arrow) or the Overwrite to Primary Storyline command (Option-Command-Down Arrow). See Move clips from and to the primary storyline without rippling the project, next.
Move clips from and to the primary storyline without rippling the project
You can move clips from and to the primary storyline without affecting the total duration of your project.
In Final Cut Pro, select the clips you want to move.

Do any of the following:
Move selected clips from the primary storyline to connected clips at the same timeline position: Choose Edit > Lift from Storyline (or press Option-Command-Up Arrow).

Gap clips fill in the vacated parts of the primary storyline, as needed.
Move selected connected clips to the primary storyline: Choose Edit > Overwrite to Primary Storyline (or press Option-Command-Down Arrow).
Depending on the amount of overlap on the connected clip, the Overwrite to Primary Storyline command either creates a split edit or overwrites any video clips at the new location and converts the audio portion of the overwritten clip to a connected clip. The Overwrite to Primary Storyline command is not available for audio-only clips.
Note: The Overwrite to Primary Storyline command works on individual connected clips only. To use this command on a clip in a connected storyline, first move the clip out of the storyline.
You can achieve the same results by dragging clips with the Position tool.
Download this guide: PDF