Final Cut Pro User Guide for Mac
- Welcome
- What’s new
-
- Intro to importing media
- If it’s your first import
- Organize files during import
-
- Import from Image Playground
- Import from iMovie for macOS
- Import from iMovie for iOS or iPadOS
- Import from Final Cut Pro for iPad
- Import from Final Cut Camera
- Import from Photos
- Import from Music
- Import from Apple TV
- Import from Motion
- Import from GarageBand and Logic Pro
- Import using workflow extensions
- Record into Final Cut Pro
- Memory cards and cables
- Supported media formats
-
- Intro to effects
-
- Intro to transitions
- How transitions are created
- Add transitions and fades
- Quickly add a transition with a keyboard shortcut
- Set the default duration for transitions
- Delete transitions
- Adjust transitions in the timeline
- Adjust transitions in the inspector and viewer
- Merge jump cuts with the Flow transition
- Adjust transitions with multiple images
- Modify transitions in Motion
- Add adjustment clips
-
- Add storylines
- Use the precision editor
- Conform frame sizes and rates
- Use XML to transfer projects
-
- Intro to sharing projects
- Share to Apple devices
- Share on the web
- Send a video frame to Pixelmator Pro
- Share in email
- Share stereo or spatial video
- Batch sharing
- Share using Compressor
- Create share destinations
- Change metadata for shared items
- View the status of shared items
- Speed up exports with simultaneous processing
- Glossary
- Copyright and trademarks
Batch rename clips in Final Cut Pro for Mac
When you import media into Final Cut Pro, the clips often contain meaningless names, such as those assigned by the camera. Although you can rename clips individually, you can also rename a selection of clips as a batch in the browser, after the media has been imported. Final Cut Pro provides customizable naming presets that make renaming large numbers of clips efficient and easy.
Batch rename clips using a naming preset
In the Final Cut Pro browser, select the clips you want to rename.
If the inspector isn’t already shown, do one of the following:
Choose Window > Show in Workspace > Inspector (or press Command-4).
Click the Inspector button in the toolbar.

Click the Info button at the top of the inspector.

In the Info inspector, click the Apply Custom Name pop-up menu and choose a naming preset.
The clips selected in the browser are renamed.
Create a new naming preset
If the naming presets that come with Final Cut Pro don’t meet your needs, you can create a new naming preset and customize it.
Tip: The easiest way to create a new naming preset is to duplicate an existing one. See Duplicate an existing naming preset, below.
In the Final Cut Pro browser, select the clips you want to rename.
Open the Info inspector.
Click the Apply Custom Name pop-up menu and choose New.
In the Naming Presets window, double-click Untitled, type a name for the new preset, then press Return.
The new naming preset appears in the Apply Custom Name submenu of the Action pop-up menu.
Duplicate an existing naming preset
The simplest way to create a new naming preset is to duplicate an existing preset—one that contains most of the name format options you want to include—and modify it.
In the Final Cut Pro browser, select the clips you want to rename.
Open the Info inspector.
Click the Apply Custom Name pop-up menu and choose Edit.
In the Naming Presets window, Control-click the preset you want to duplicate, then choose Duplicate.

The duplicate naming preset appears below the original preset.
Enter a name for the duplicate preset, then press Return.
You can now modify the preset to suit your needs.
Modify an existing naming preset
In the Final Cut Pro browser, select the clips you want to rename.
Open the Info inspector.
Click the Apply Custom Name pop-up menu and choose Edit.
In the Naming Presets window, add naming tokens—metadata elements you can use to create a naming preset—by dragging them from the Clip Info, Date/Time, Format, and Camera areas to the Format field.
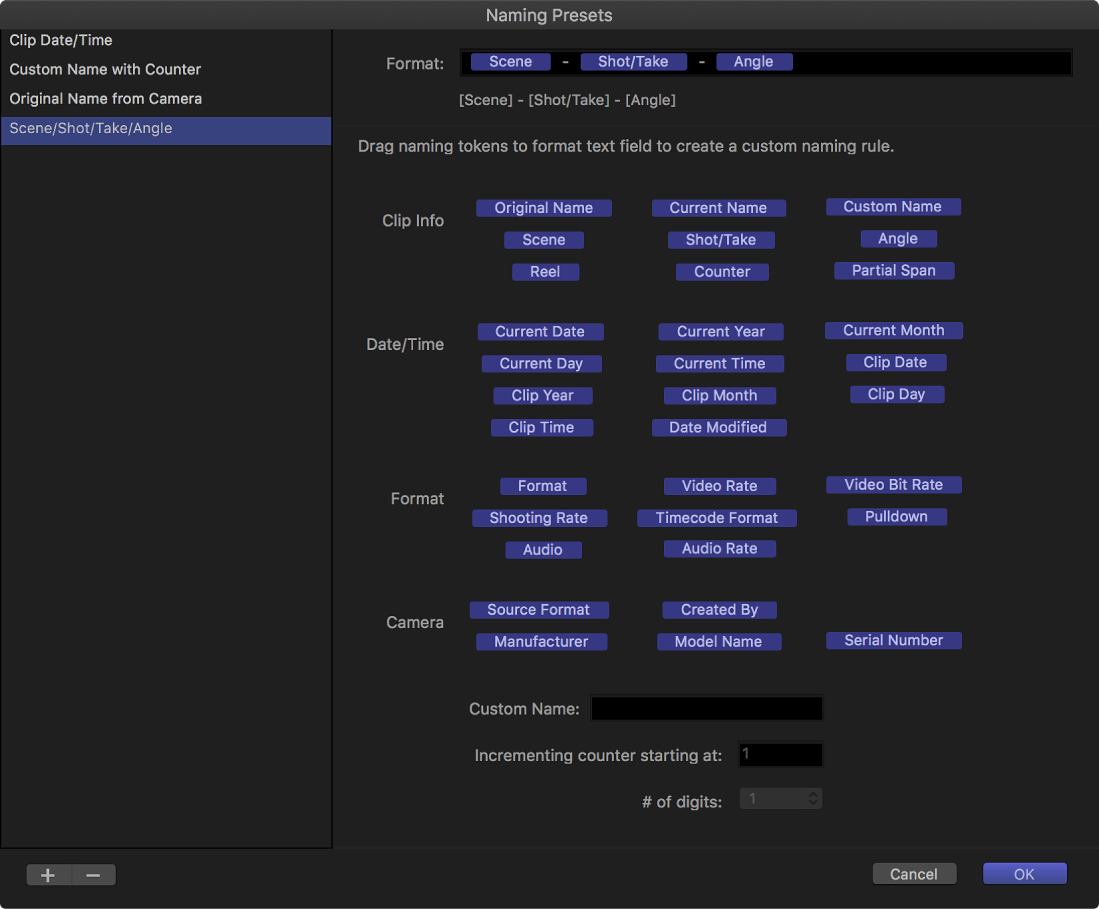
To remove a naming token, select it in the Format field and press Delete.
Rearrange the tokens in the Format field by dragging them into new positions.
If you like, add text characters, such as underscores (_) and spaces, between naming tokens in the Format field.
When you’re satisfied with the naming preset’s new format, click OK.
Remove a naming preset
Select a clip in the Final Cut Pro browser or timeline.
Open the Info inspector.
Click the Apply Custom Name pop-up menu and choose Edit.
In the Naming Presets window, select the naming preset you want to remove, then click the Remove Presets button (with a minus sign).
The naming preset is removed from the Naming Presets window.
Download this guide: PDF