
Calculate values using data in table cells in Numbers on iPhone
You can create formula or function cells that automatically perform calculations using the data in any cells you select. For example, you can compare values in two cells, calculate the sum or product of cells and so on. The result of a formula or function appears in the cell where you entered it.
You can also use any of the predefined mathematical functions included with Numbers to create formulas. There are more than 250 functions for applications including statistics, engineering and finance, some of which retrieve information remotely via the Internet. Detailed information about each function appears in Formulas and Functions Help online and in the Functions Browser, which appears when you begin adding a function to a cell (by tapping  ).
).
Insert a formula
You can create simple or complex arithmetic formulas to perform calculations on the values in your tables.
Go to the Numbers app
 on your iPhone.
In a spreadsheet, tap the cell where you want the result to appear, then tap
 at the bottom of the screen.
Tap
 above the keyboard on the left.
The Formula Editor and keyboard appear.
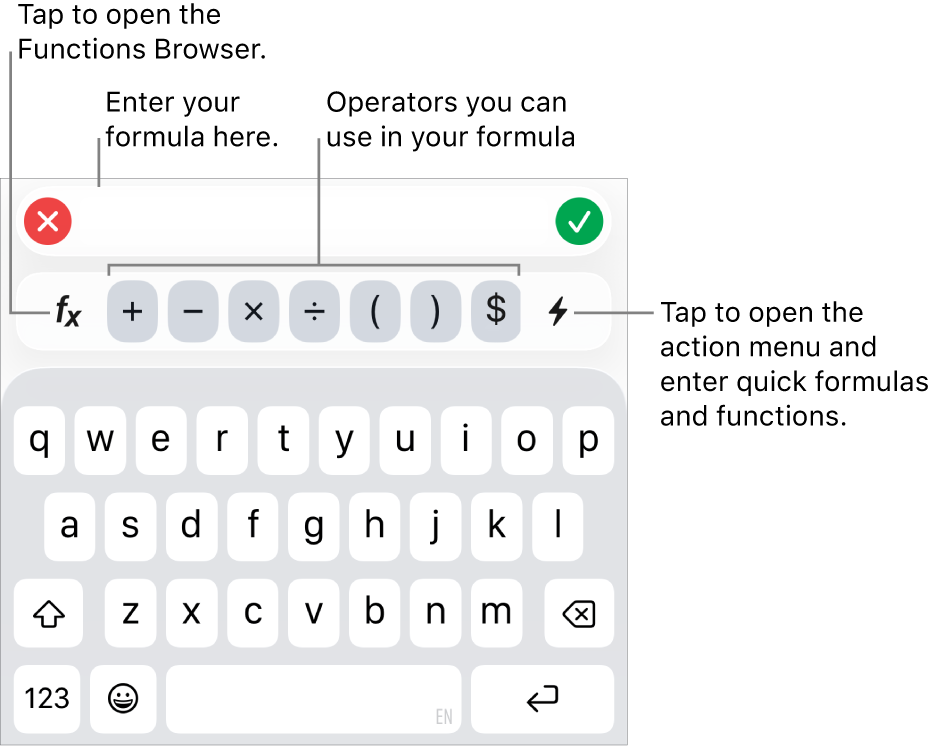
Tip: To perform a basic calculation such as a sum, average or product, you can also select the data you want to use, tap
 at the bottom of the screen, then choose a formula. Numbers automatically inserts the formula and chooses a result cell based on your selection.
Tap a cell to use in your formula or enter a value by doing any of the following:
Add text: Tap the letter keys.
Add a function: If you know which function you want to enter, start typing it, then tap one of the suggestions that appears.
If you’re not sure which function you need, tap
to open the Functions Browser, tap Categories at the bottom of the Functions Browser to see a list of the function categories, then tap a category. Tap a function to insert it in the Formula Editor (swipe up and down to see the available functions). To learn more about any function, tap  next to it. (The first time you tap , it might take a few seconds to display the information.)
Add a number or symbol: Tap symbols in the top row of the keyboard, or to enter numbers, tap

Tap an arithmetic operator, then select another cell to use in your formula, or type a value.
If you don’t specify an operator, Numbers inserts a + between cell references by default.
Note: To include values in your formula from a table on a different sheet, go to that sheet and tap the cell or range of cells.
Repeat steps 3 to 4 until you complete your formula.
Tap
 in the Formula Editor to enter the formula in the cell.
If you tap
 , you delete what you just entered; if you then tap
  on the left side of the Formula Editor, you delete the entire formula and close the Formula Editor.
If there’s an error in your formula,  appears in the result cell. Select the cell, then tap in the Formula Editor to see the error message. Drag it to the left, if necessary, to read the whole message.
Insert a function
Go to the Numbers app
on your iPhone.In a spreadsheet, tap the cell where you want the result to appear.
Tap
at the bottom of the screen, then tap above the keyboard on the left.The Formula Editor and keyboard appear.
If you know which function you want to enter, start typing it, then tap one of the suggestions that appears.
If you’re not sure which function you need, tap
on the keyboard, tap Categories at the bottom of the screen to see a list of the function categories, then tap a category.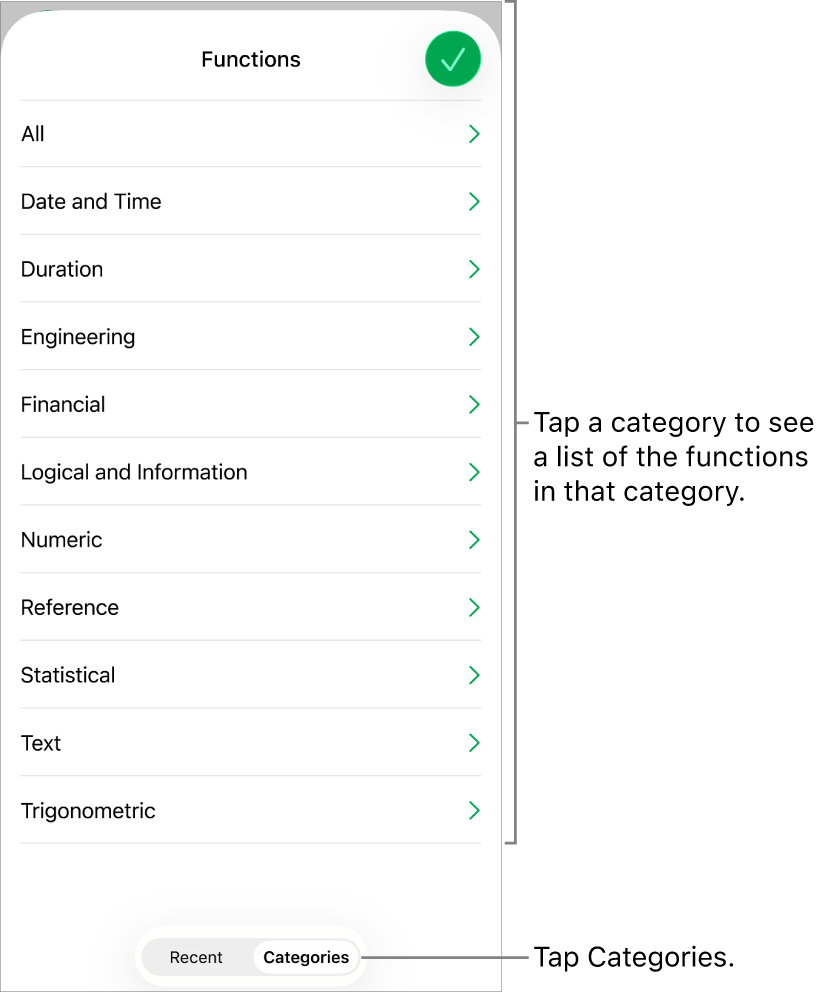
You can also tap Recent to select a function you used recently.
Tap a function to insert it in the Formula Editor.
Swipe up and down to see the available functions.
To learn more about any function, tap
next to it. (The first time you tap , it might take a few seconds to display the information.)Tap each token in the Formula Editor, then select a cell or range, choose an option from the token’s pop-up menu (if it has an arrow) or enter another valid value for the argument.
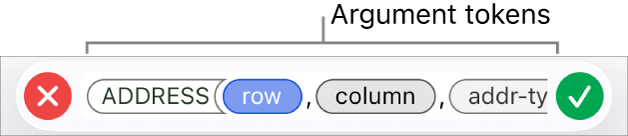
Tap
to enter the result in the cell.If you’ve just added data to an existing formula and you tap
, you delete the added data, but the previous formula remains in the cell; if you then tap on the left side of the Formula Editor, you delete the entire formula and close the Formula Editor.To enter data in another cell, tap Return on the keyboard or tap another cell.
If there’s an error in your formula, appears in the result cell. Select the cell, then tap in the Formula Editor to see the error message. Drag it to the left, if necessary, to read the whole message.
Compare values using a formula
You can use comparison operators to check whether the values in two cells are equal, or if one value is greater or less than the other. To do this, you must set up a statement within a cell — for example A1 > A2, meaning the value in cell A1 is greater than the value in cell A2. The result of the comparison operator is expressed as “true” or “false”.
Go to the Numbers app
on your iPhone.In a spreadsheet, double-tap the cell where you want the result to appear.
Tap the cell where you want the result to appear, tap
at the bottom of the screen, then tap above the keyboard on the left.The formula keyboard and editor appear.
Tap a cell to use as the first argument in your formula or type a value.
Tap a comparison operator (<, >, = or ≠) in the top row of the keyboard.
If you can’t see the comparison operators, drag the top row to the left.
Tap a cell to use as the next argument in your formula or type a value.
Note: To select a cell from a table on a different sheet, go to that sheet and tap the cell.
Tap
in the Formula Editor to enter the formula in the cell.If you tap
, you delete what you just entered; if you then tap on the left side of the Formula Editor, you delete the entire formula and close the Formula Editor.
If there’s an error in your formula, appears in the result cell. Select the cell, then tap in the Formula Editor to see the error message. Drag it to the left, if necessary, to read the whole message.
Refer to cells in formulas
In your formulas, you can include references to cells, ranges of cells, and whole columns or rows of data — including cells in other tables and on other sheets. Numbers uses the values in the referenced cells to calculate the result of the formula. For example, if you include “A1” in a formula, it refers to the value in cell A1 (the cell in Column A and Row 1).
Note: If your table uses categories and you add a new row within a range of reference cells, the formula results won’t include the new row unless you change the cell reference.
The examples below show the use of cell references in formulas.
If the referenced range is more than one cell, the starting and ending cells are separated by a single colon.
COUNT(A3:D7)
If the reference is to a cell in another table, the reference must contain the name of the table (unless the cell name is unique within all tables).
Table 2::B2
Note that the table name and cell reference are separated by a double colon (::). When you select a cell in another table for a formula, the name of the table is automatically included.
If the reference is to a cell in a table in another sheet, the sheet name must also be included (unless the cell name is unique within all the sheets).
SUM(Sheet 2::Table 1::C2:G2)
The sheet name, table name and cell reference are separated by double colons. When you tap a cell in another sheet while building a formula, the name of the sheet and the name of the table are automatically included in the formula.
To refer to a column, you can use the column letter. The formula below calculates the total of the cells in the third column:
SUM(C)
To refer to a row, you can use the row number. The formula below calculates the total of the cells in the first row:
SUM(1:1)
To refer to a row or column with a header, you can use the header name. The formula below totals all the cells in the row with the header “Revenue”:
SUM(Revenue)
The formula below refers to a column by its header name “Number of Guests” and cells E4-E19 in a table on another sheet.
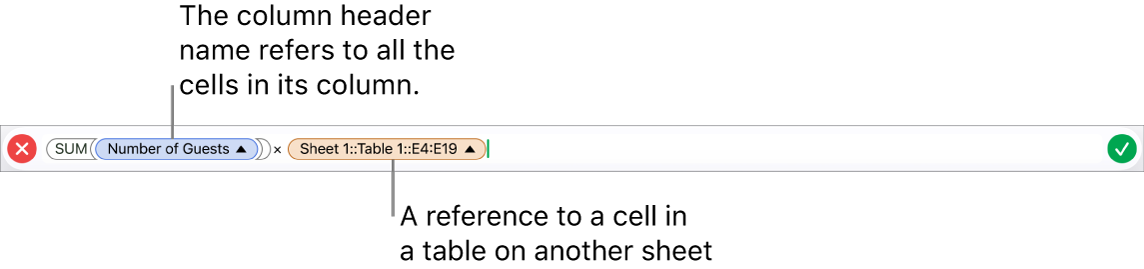
Preserve row or column references in formulas
You can set row and column references in a formula to be absolute so that you can use the same formula elsewhere in your spreadsheet without the cell references changing, as they would otherwise.
If you don’t preserve the row or column references, if you move the formula (by cutting and pasting, or by adding new rows and columns), the references are adjusted relative to the formula’s new location.
Go to the Numbers app
on your iPhone.In a spreadsheet, double-tap the cell with the formula whose cell addresses you want to maintain.
The Formula Editor and keyboard appear.
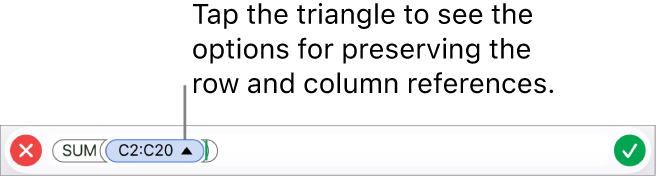
Tap the triangle on the token representing the cell range you want to preserve.
Turn on Preserve Row or Preserve Column for the beginning or ending addresses of the selected range.
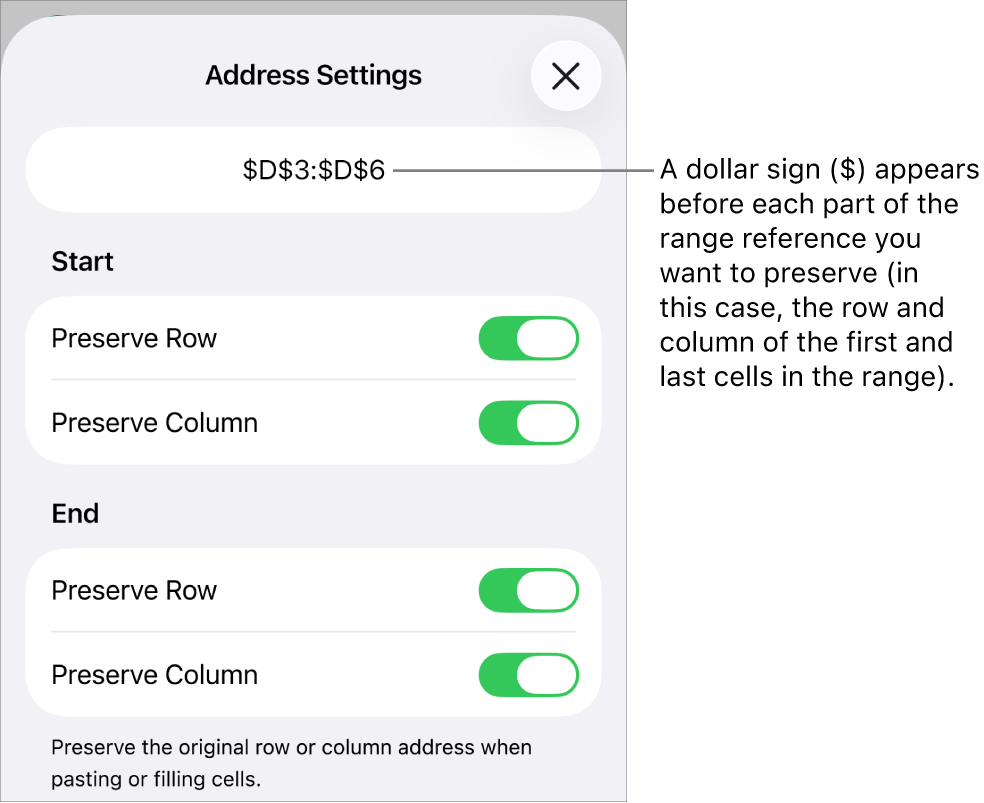
If you change the number of rows or columns in the table, or if you move the formula to a different cell, the preserved row or column references are adjusted, but they maintain their absolute original cell references.
Tap
 to enter this setting.
To continue entering data, tap Return on the keyboard or tap another cell.
Change an existing formula
You can edit an existing formula so that it refers to different cells.
Go to the Numbers app
on your iPhone.In a spreadsheet, tap the result cell with the formula you want to edit, then tap
at the bottom of the screen.The Formula Editor and keyboard appear.
Do any of the following:
Add more cell references: Tap in the argument area of the Formula Editor to place the insertion point where you want to add cell references, then select the cells you want to add.
Remove cell references: In the Formula Editor, select the unwanted cell references, then tap
 on the keyboard.
Change the cell references: Select the existing cell addresses you want to change, then tap the new cells.
Tap
to enter the result in the cell.If you’ve just added data to an existing formula and you tap
, you delete the added data, but the previous formula remains in the cell. If you then tap on the left side of the Formula Editor, you delete the entire formula and close the Formula Editor.To enter data in another cell, tap the cell or tap Return on the keyboard.
If there’s an error in your formula, appears in the result cell. Select the cell, then tap in the Formula Editor to see the error message. Drag it to the left, if necessary, to read the whole message.