Motion User Guide
- Welcome
- What’s new
-
- Intro to basic compositing
-
- Intro to transforming layers
-
- Intro to transforming layers in the canvas
- Transform layer properties in the canvas
- Transform tools
- Change layer position, scale, or rotation
- Move a layer’s anchor point
- Add a drop shadow to a layer
- Distort or shear a layer
- Crop a layer
- Modify shape or mask points
- Transform text glyphs and other object attributes
- Align layers in the canvas
- Transform layers in the HUD
- Transform 2D layers in 3D space
-
- Intro to the Timeline
- Display or resize the Timing pane
-
- Edit in the Timeline
- Move objects in the Timeline
- Distribute objects in the Timeline
- Trim objects in the Timeline
- Slip video layers in the Timeline
- Split objects in the Timeline
- Delete objects in the Timeline
- Copy and paste objects in the Timeline
- Group tracks in the Timeline
- Edit the group track in the Timeline
- Navigate in the Timeline
- Show and modify keyframes in the Timeline
- Edit in the mini-Timeline
-
- Intro to behaviors
- Behaviors versus keyframes
-
- Intro to behavior types
-
- Intro to Parameter behaviors
- Audio behavior
- Average behavior
- Clamp behavior
- Custom behavior
- Add a Custom behavior
- Exponential behavior
- Link behavior
- Use the Link behavior to control text strings
- Logarithmic behavior
- MIDI behavior
- Add a MIDI behavior
- Negate behavior
- Oscillate behavior
- Create a decaying oscillation
- Overshoot behavior
- Quantize behavior
- Ramp behavior
- Randomize behavior
- Rate behavior
- Reverse behavior
- Stop behavior
- Track behavior
- Wriggle behavior
-
- Intro to Simulation behaviors
- Align to Motion behavior
- Attracted To behavior
- Attractor behavior
- Drag behavior
- Drift Attracted To behavior
- Drift Attractor behavior
- Edge Collision behavior
- Gravity behavior
- Orbit Around behavior
- Random Motion behavior
- Repel behavior
- Repel From behavior
- Rotational Drag behavior
- Spring behavior
- Vortex behavior
- Wind behavior
- Additional behaviors
-
- Intro to shapes, masks, and paint strokes
- Edit fill, outline, and feathering
- Keyframe shape control points
- Convert between shapes and masks
- Using filters and masks with shapes
- Copy shape styles
- Save custom shapes and shape styles
-
- Intro to using generators
- Add a generator
-
- Intro to image generators
- Caustics generator
- Cellular generator
- Checkerboard generator
- Clouds generator
- Color Solid generator
- Concentric Polka Dots generator
- Concentric Shapes generator
- Gradient generator
- Grid generator
- Japanese Pattern generator
- Lens Flare generator
- Manga Lines generator
- Membrane generator
- Noise generator
- One Color Ray generator
- Op Art 1 generator
- Op Art 2 generator
- Op Art 3 generator
- Overlapping Circles generator
- Radial Bars generator
- Soft Gradient generator
- Spirals generator
- Spiral Drawing generator
- Use Spiral Drawing onscreen controls
- Star generator
- Stripes generator
- Sunburst generator
- Truchet Tiles generator
- Two Color Ray generator
- Save a custom generator
-
- Intro to filters
- Browse and preview filters
- Apply or remove filters
-
- Intro to filter types
-
- Intro to Color filters
- Brightness filter
- Channel Mixer filter
- Color Adjustments filter
- Color Balance filter
- Example: Color-balance two layers
- Color Curves filter
- Use the Color Curves filter
- Color Reduce filter
- Color Wheels filter
- Use the Color Wheels filter
- Colorize filter
- Contrast filter
- Custom LUT filter
- Use the Custom LUT filter
- Gamma filter
- Gradient Colorize filter
- HDR Tools filter
- Hue/Saturation filter
- Hue/Saturation Curves filter
- Use the Hue/Saturation Curves filter
- Levels filter
- Negative filter
- OpenEXR Tone Map filter
- Sepia filter
- Threshold filter
- Tint filter
-
- Intro to Distortion filters
- Black Hole filter
- Bulge filter
- Bump Map filter
- Disc Warp filter
- Droplet filter
- Earthquake filter
- Fisheye filter
- Flop filter
- Fun House filter
- Glass Block filter
- Glass Distortion
- Insect Eye filter
- Mirror filter
- Page Curl filter
- Poke filter
- Polar filter
- Refraction filter
- Ring Lens filter
- Ripple filter
- Scrape filter
- Sliced Scale filter
- Use the Sliced Scale filter
- Sphere filter
- Starburst filter
- Stripes filter
- Target filter
- Tiny Planet filter
- Twirl filter
- Underwater filter
- Wave filter
-
- Intro to Stylize filters
- Add Noise filter
- Bad Film filter
- Bad TV filter
- Circle Screen filter
- Circles filter
- Color Emboss filter
- Comic filter
- Crystallize filter
- Edges filter
- Extrude filter
- Fill filter
- Halftone filter
- Hatched Screen filter
- Highpass filter
- Indent filter
- Line Art filter
- Line Screen filter
- MinMax filter
- Noise Dissolve filter
- Pixellate filter
- Posterize filter
- Relief filter
- Slit Scan filter
- Slit Tunnel filter
- Texture Screen filter
- Vignette filter
- Wavy Screen filter
- About filters and color processing
- Publish filter controls to Final Cut Pro
- Using filters on alpha channels
- Filter performance
- Save custom filters
-
- Intro to 360-degree video
- 360-degree projects
- Create 360-degree projects
- Add 360-degree video to a project
- Create a tiny planet effect
- Reorient 360-degree media
- Creating 360-degree templates for Final Cut Pro
- 360-degree-aware filters and generators
- Export and share 360-degree projects
- Guidelines for better 360-degree projects
-
- Intro to exporting projects
- Export a QuickTime movie
- Export audio only
- Export a still image
- Export a still image to Pixelmator Pro
- Export an image sequence
- Export to Apple devices
- Export to email
- Export using Compressor
- Create share destinations
- Render settings
- View the status of shared items
- Share notifications
-
- Intro to settings and shortcuts
-
- Intro to Keyboard shortcuts
- Use function keys
- General keyboard shortcuts
- Audio list keyboard shortcuts
-
- Tools keyboard shortcuts
- Transform tool keyboard shortcuts
- Select/Transform tool keyboard shortcuts
- Crop tool keyboard shortcuts
- Edit Points tool keyboard shortcuts
- Edit shape tools keyboard shortcuts
- Pan and Zoom tools keyboard shortcuts
- Shape tools keyboard shortcuts
- Bezier tool keyboard shortcuts
- B-Spline tool keyboard shortcuts
- Paint Stroke tool keyboard shortcuts
- Text tool keyboard shortcuts
- Shape mask tools keyboard shortcuts
- Bezier Mask tool keyboard shortcuts
- B-Spline Mask tool keyboard shortcuts
- Magnetic Mask tool keyboard shortcuts
- Transport control keyboard shortcuts
- View option keyboard shortcuts
- HUD keyboard shortcuts
- Inspector keyboard shortcuts
- Keyframe Editor keyboard shortcuts
- Layers keyboard shortcuts
- Library keyboard shortcuts
- Media list keyboard shortcuts
- Timeline keyboard shortcuts
- Keyframing keyboard shortcuts
- Shape and Mask keyboard shortcuts
- 3D keyboard shortcuts
- Miscellaneous keyboard shortcuts
- Touch Bar shortcuts
- Move assets to another computer
- Work with GPUs
- Glossary
- Copyright and trademarks
Move and rotate 3D text in Motion
3D text has multiple facets—front, extruded sides, edges (bevels), and back. When you add 3D text to your project, you’ll see the front facet, but depending on the angle of the text, you may not be able to see the other facets.

You can view these other facets by moving or rotating the 3D text object.
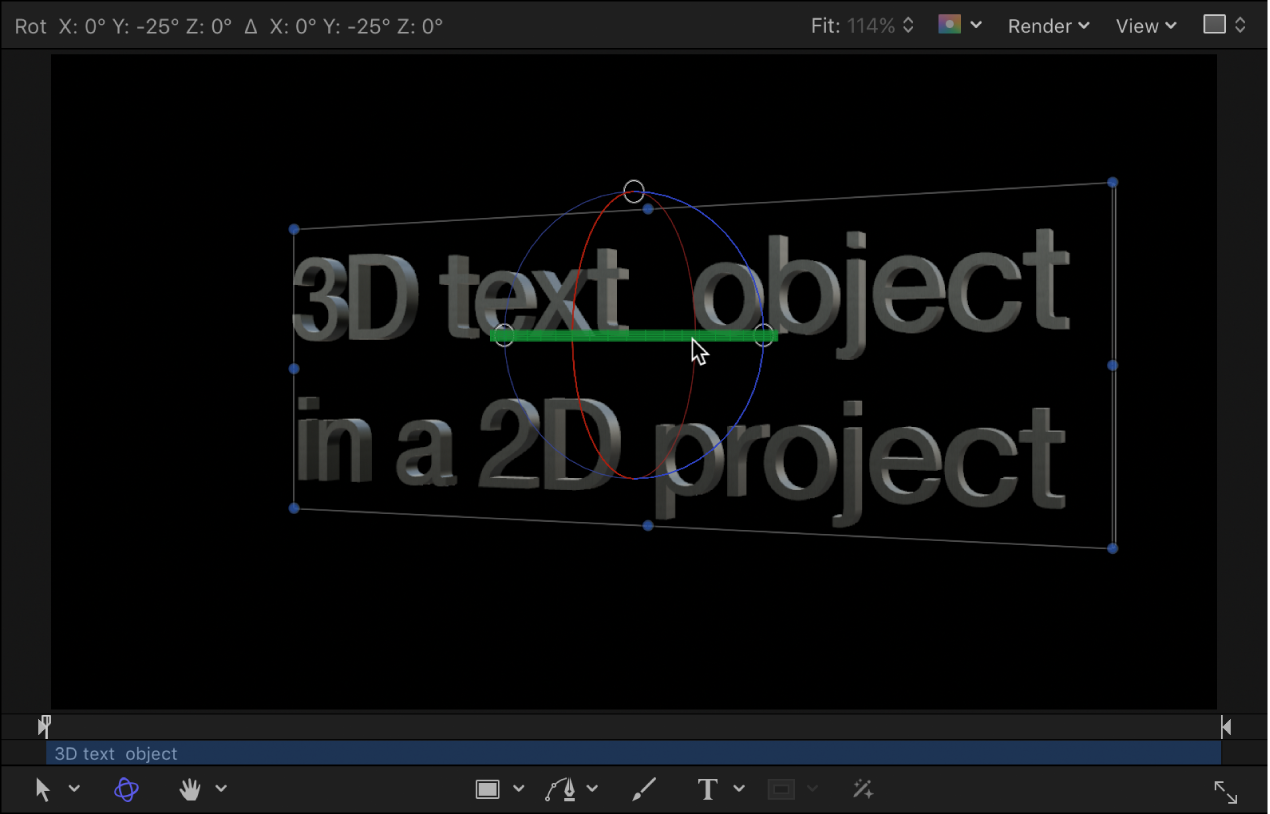
Move or rotate 3D text using onscreen handles
In the Layers list, Timeline, or canvas in Motion, select a 3D text object.
In the canvas toolbar, click the 3D Transform tool.
3D transform controls appear on the selected 3D text object in the canvas.
Do any of the following:
Move the text object horizontally along its X axis: Drag the red arrow.
Move the text object vertically along its Y axis: Drag the green arrow.
Move the text object forward or backward along its Z axis: Drag the blue arrow.

Rotate the text object around its X axis: Move the pointer over the rotation handles until a red rotation ring appears, then drag the red ring.
Rotate the text object around its Y axis: Move the pointer over the rotation handles until a green rotation ring appears, then drag the green ring.
Rotate the text object around its Z axis: Move the pointer over the rotation handles until a blue rotation ring appears, then drag the blue ring.

Move or rotate 3D text using HUD controls
In the Layers list, Timeline, or canvas in Motion, select a 3D text object.
In the canvas toolbar, click the 3D Transform tool.
Press F7 to open the HUD (if it’s not already open).
In the HUD, drag in the Move or Rotate squares.

Move or rotate individual text characters
You can also move or rotate individual characters (glyphs) of a 3D text object.
In the Layers list, Timeline, or canvas of Motion, select a 3D text object.
In the canvas toolbar, click and hold the transform tools pop-up menu, then choose Transform Glyph.

In the canvas, select the glyph you want to move or rotate.
A 3D bounding box with position handles and rotation handles appears around the selected glyph.
Do any of the following:
In the canvas, drag a position handle (a color arrow) to move the selected glyph along its X, Y, or Z (depth) axis.
In the canvas, drag a rotation handle (a small white circle) to rotate the selected glyph around its X, Y, or Z axis.
As you drag, three rotation rings appear (red, green, and blue), each corresponding to an axis. The ring for the currently active axis is highlighted.

For more information about transforming glyphs, see Intro to text glyphs.
Tip: You can also view 3D text from different perspectives by adding a camera and converting your project to 3D. See Add a camera.
Download this guide: PDF