Final Cut Pro User Guide for Mac
- Welcome
- What’s new
-
- Intro to importing media
- If it’s your first import
- Organize files during import
-
- Import from Image Playground
- Import from iMovie for macOS
- Import from iMovie for iOS or iPadOS
- Import from Final Cut Pro for iPad
- Import from Final Cut Camera
- Import from Photos
- Import from Music
- Import from Apple TV
- Import from Motion
- Import from GarageBand and Logic Pro
- Import using workflow extensions
- Record into Final Cut Pro
- Memory cards and cables
- Supported media formats
-
- Intro to effects
-
- Intro to transitions
- How transitions are created
- Add transitions and fades
- Quickly add a transition with a keyboard shortcut
- Set the default duration for transitions
- Delete transitions
- Adjust transitions in the timeline
- Adjust transitions in the inspector and viewer
- Merge jump cuts with the Flow transition
- Adjust transitions with multiple images
- Modify transitions in Motion
- Add adjustment clips
-
- Add storylines
- Use the precision editor
- Conform frame sizes and rates
- Use XML to transfer projects
-
- Intro to sharing projects
- Share to Apple devices
- Share on the web
- Send a video frame to Pixelmator Pro
- Share in email
- Share stereo or spatial video
- Batch sharing
- Share using Compressor
- Create share destinations
- Change metadata for shared items
- View the status of shared items
- Speed up exports with simultaneous processing
- Glossary
- Copyright and trademarks
Use the Auto Mask in Final Cut Pro for Mac
You can use the Auto Mask to automatically mask objects in your video, eliminating the need for manual tracking. Auto Mask analyzes your video and instantly isolates recognized objects such as people, facial features, hair, skin, clothing, skies, foliage, and animals.
Note: You can also isolate objects in your video using the Magnetic Mask or Scene Removal Mask, but the Auto Mask is the fastest way to mask recognized objects. To use the Auto Mask to define the area of a video effect, see Add an Auto Mask to a video effect.
Add an Auto Mask to isolate recognized parts of an image
Adding the Auto Mask effect to a clip creates a matte, which allows you to isolate recognized parts of an image for color correction, or to composite the isolated foreground image over a different background image.
In Final Cut Pro, add a clip to the timeline.
Select the clip in the timeline, then position the playhead at a point within the clip that shows the area you want to mask.
Do one of the following:
Choose Modify > Add Auto Mask (or press Control-Command-K).
Click the Enhancements pop-up menu below the viewer, then choose Add Auto Mask.
Open the Effects browser, then select the Auto Mask effect. Drag the effect to the viewer, directly onto the object or body part that you want to mask.
Tip: To quickly find the Auto Mask effect, type “auto” in the Effects browser search field.
As you drag the effect over the viewer, objects and shapes in the image are highlighted in a bright color.

Drag the effect to the timeline clip.
Double-click the Auto Mask effect thumbnail in the Effects browser.
Do one of the following:
Choose Window > Show in Workspace > Inspector (or press Command-4).
Click the Inspector button in the toolbar.

To open the Video inspector, click the Video button at the top of the inspector.

In the viewer, position the pointer on an object or facial feature in the image that you want to mask, then click to select it. (This step may not be necessary if you dragged the effect directly onto the object.)
Objects and facial features become highlighted, showing where the Auto Mask will be applied. The Auto Mask menu appears, listing the possible masks that can be applied to the current image.

Do one of the following:
In the viewer, move the pointer to reveal available masks, then click a mask to select it.
In the Auto Mask menu, click the thumbnails (or select or deselect the corresponding checkboxes) to add or remove masks.
To add the selected mask or masks, click Add Auto Mask at the bottom of the menu.
The background is removed and replaced with a transparent background.
In the inspector, an Auto Mask section appears for each mask that you add. By default, the masks are named Auto Mask 1, Auto Mask 2, and so on, but you can rename them.
To view or make changes to a specific Auto Mask, click its name in the inspector to select it. See View and adjust Auto Masks, below.

To composite the clip over a different background, use connected clips. See Connect clips.
View and adjust Auto Masks
In Final Cut Pro, select a clip in the timeline that has one or more Auto Masks applied.
Position the playhead within the section of the clip that has the Auto Mask applied, so that it appears in the viewer.
Open the Video inspector, then click the name of a specific Auto Mask that you want to view or adjust.
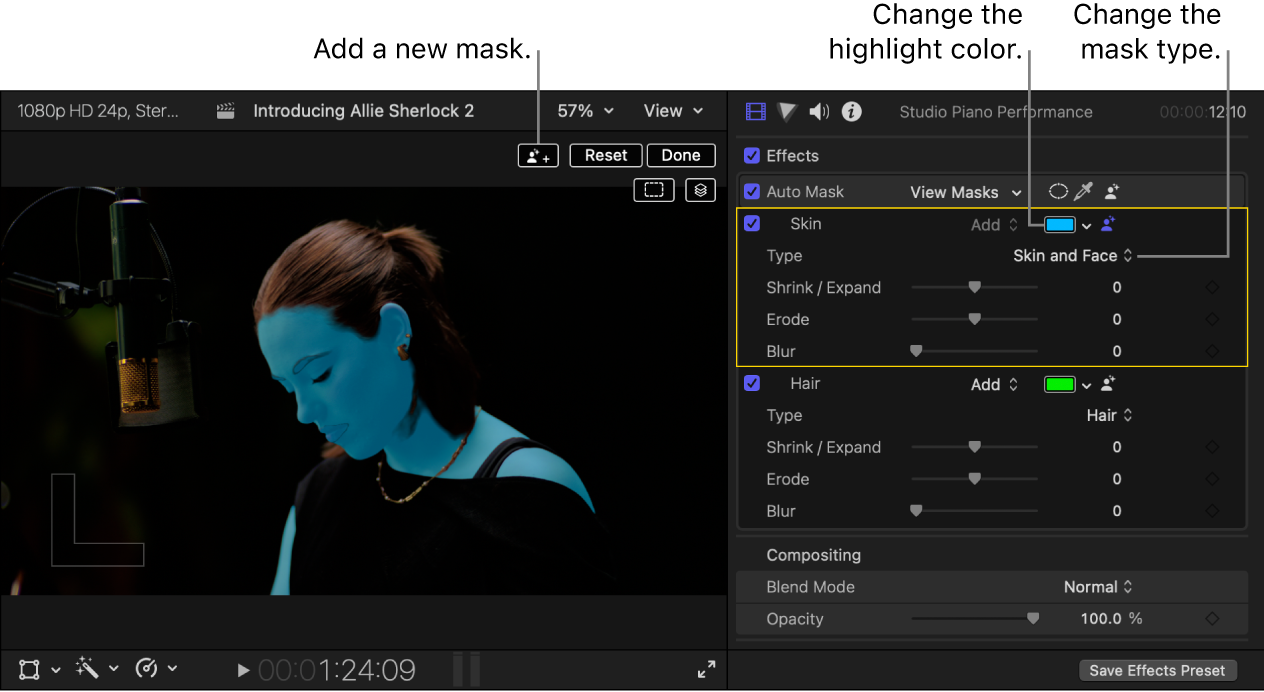
To view the contour of the selected Auto Mask, click the Show Mask Contour button
 in the viewer.
To highlight all Auto Masks, click the Show All Masks button
 in the viewer.
Adjust any of the following Auto Mask settings in the Video inspector:
Name: Double-click the text to select it, then enter a new name.
Highlight color: Click the down arrow next to the color well to display the pop-up color palette, then select a new highlight color for the mask.
Type: Choose a different mask type, including types that were not detected in the current frame.
Shrink/Expand: Drag this slider to change the mask size. Drag the slider left to shrink the mask, or right to expand it.
Erode: Drag this slider to refine the mask edge by adding feathering inward or outward without shifting the edge itself (the way the Shrink/Expand slider does).
Blur: Drag this slider to soften the mask edge.
To reset Auto Mask settings to their default values, click Reset in the viewer.
To add another Auto Mask, click the New Auto Mask button
 in the viewer.
When you’re finished making adjustments, click Done in the viewer.
Download this guide: PDF