iPhone User Guide
- Welcome
-
-
- iPhone models compatible with iOS 18
- iPhone XR
- iPhone XS
- iPhone XS Max
- iPhone 11
- iPhone 11 Pro
- iPhone 11 Pro Max
- iPhone SE (2nd generation)
- iPhone 12 mini
- iPhone 12
- iPhone 12 Pro
- iPhone 12 Pro Max
- iPhone 13 mini
- iPhone 13
- iPhone 13 Pro
- iPhone 13 Pro Max
- iPhone SE (3rd generation)
- iPhone 14
- iPhone 14 Plus
- iPhone 14 Pro
- iPhone 14 Pro Max
- iPhone 15
- iPhone 15 Plus
- iPhone 15 Pro
- iPhone 15 Pro Max
- iPhone 16
- iPhone 16 Plus
- iPhone 16 Pro
- iPhone 16 Pro Max
- iPhone 16e
- Setup basics
- Make your iPhone your own
- Take great photos and videos
- Keep in touch with friends and family
- Share features with your family
- Use iPhone for your daily routines
- Expert advice from Apple Support
-
- What’s new in iOS 18
-
- Adjust the volume
- Turn the iPhone flashlight on or off
- Silence iPhone
- Multitask with Picture in Picture
- Access features from the Lock Screen
- Use the Dynamic Island
- Perform quick actions
- Search on iPhone
- Get information about your iPhone
- Manage storage on iPhone
- View or change cellular data settings
- Travel with iPhone
-
- Change sounds and vibrations
- Use and customize the Action button
- Create a custom Lock Screen
- Change the wallpaper
- Use and customize Control Center
- Adjust the screen brightness and color balance
- Keep the iPhone display on longer
- Use StandBy
- Customize the text size and zoom setting
- Change the name of your iPhone
- Change the date and time
- Change the language and region
- Change the default apps
- Change your default search engine
- Rotate your iPhone screen
- Customize sharing options
-
- Use the Camera Control
- Use the Camera Control to open another app
- Adjust the shutter volume
- Adjust HDR camera settings
- Record videos
- Take spatial photos and record spatial videos for Apple Vision Pro
- Change sound recording options
- Record ProRes videos
- Record videos in Cinematic mode
- Change video recording settings
- Save camera settings
- Customize the Main and Fusion camera lens
- Change advanced camera settings
- View, share, and print photos
- Use Live Text
- Scan a QR code
-
-
- Create and edit events in Calendar
- Send invitations
- Reply to invitations
- Change how you view events
- Search for events
- Change Calendar settings
- Schedule or display events in a different time zone
- Keep track of events
- Use multiple calendars
- Use reminders
- Use the Holidays calendar
- Share iCloud calendars
- Compass
-
- Get started with FaceTime
- Create a FaceTime link
- Take a Live Photo
- Record and transcribe an audio call
- Turn on Live Captions in a FaceTime call
- Use other apps during a call
- Make a Group FaceTime call
- View participants in a grid
- Use SharePlay to watch, listen, and play together
- Share your screen in a FaceTime call
- Request or give remote control in a FaceTime call
- Collaborate on a document in FaceTime
- Use video conferencing features
- Hand off a FaceTime call to another Apple device
- Change the FaceTime video settings
- Change the FaceTime audio settings
- Change your appearance
- Leave a call or switch to Messages
- Block and silence FaceTime calls from unknown callers
- Report a call as spam
-
- Get started with Freeform
- Create a Freeform board
- Draw or handwrite
- Solve handwritten math problems
- Add text in sticky notes, shapes, and text boxes
- Add shapes, lines, and arrows
- Add diagrams
- Add photos, videos, and other files
- Apply consistent styles
- Position items on a board
- Navigate and present scenes
- Send a copy or PDF
- Print a board
- Share boards and collaborate
- Search Freeform boards
- Delete and recover boards
- Change Freeform settings
-
- Intro to Home
- Upgrade to the new version of Apple Home
- Set up accessories
- Control accessories
- Control your home using Siri
- Use Grid Forecast to plan your energy usage
- View electricity usage and rates
- Set up HomePod
- Control your home remotely
- Create and use scenes
- Use automations
- Set up security cameras
- Use Face Recognition
- Unlock your door with a home key on iPhone or Apple Watch
- Configure a router
- Invite others to control accessories
- Add more homes
-
- Get started with Maps
- Set your location and map view
-
- Set your home, work, or school address
- Ways to get travel directions
- Get driving directions
- Set up electric vehicle routing
- View a route overview or a list of turns
- Change or add stops to your route
- Get directions to your parked car
- Get walking directions
- Save walks or hikes
- Get transit directions
- Get cycling directions
- Book rides
- Download offline maps
- Clear location history
- Delete recent directions
- Report an issue with Maps
-
- Set up Messages
- About iMessage
- Send and reply to messages
- Text via satellite
- Schedule a text message to send later
- Unsend and edit messages
- Keep track of messages
- Search
- Forward and share messages
- Group conversations
- Share screens
- Collaborate on projects
- Use iMessage apps
- Take and edit photos or videos
- Share photos, links, and more
- Send stickers
- Create and send Memoji
- React with Tapbacks
- Style and animate messages
- Draw and handwrite messages
- Send and save GIFs
- Request, send, and receive payments
- Send and receive audio messages
- Share your location
- Turn read receipts on or off
- Change notifications
- Block, filter, and report messages
- Delete messages and attachments
- Recover deleted messages
-
- Get music
-
-
- Play music
- Use the music player controls
- Use Siri to play music
- Play lossless audio
- Play Spatial Audio
- Listen to radio
- Play music together using SharePlay
- Play music together in the car
- Adjust the sound
- Queue up your music
- Shuffle or repeat songs
- Sing along with Apple Music
- Show song credits and lyrics
- Tell Apple Music what you enjoy
-
- Get started with News
- Get News notifications and newsletters
- Use News widgets
- See news stories chosen just for you
- Read and share stories
- Follow your favorite teams with My Sports
- Listen to Apple News Today
- Search for channels, topics, stories, or recipes
- Save stories in News
- Clear your reading history in News
- Subscribe to individual news channels
-
- Get started with Notes
- Create and format notes
- Use Quick Notes
- Add drawings and handwriting
- Enter formulas and equations
- Add photos, video, and more
- Record and transcribe audio
- Scan text and documents
- Work with PDFs
- Add links
- Search notes
- Organize in folders
- Organize with tags
- Use Smart Folders
- Share and collaborate
- Export or print notes
- Lock notes
- Add or remove accounts
- Change the Notes view
- Change Notes settings
-
- Use passwords
- Find your password for a website or app
- Change the password for a website or app
- Remove a password
- Recover a deleted password
- Create a password for a website or app
- Show passwords in large text
- Use passkeys to sign in to websites and apps
- Sign in with Apple
- Share passwords
- Automatically fill in strong passwords
- See websites excluded from AutoFill
- Change weak or compromised passwords
- View your passwords and related information
- Find and share your Wi-Fi password
- Share passwords securely with AirDrop
- Make your passwords available on all your devices
- Automatically fill in verification codes
- Automatically fill in SMS passcodes
- Sign in with fewer CAPTCHA challenges
- Use two-factor authentication
- Use security keys
-
- Make a call
- Record and transcribe a call
- Change your Phone settings
- View and delete the call history
- Answer or decline incoming calls
- While on a call
- Have a conference or three-way call
- Set up voicemail
- Check voicemail
- Change voicemail greeting and settings
- Select ringtones and vibrations
- Make calls using Wi-Fi
- Set up call forwarding
- Set up call waiting
- Block or avoid unwanted calls
-
- Get started with Photos
- View photos and videos
- See photo and video information
- Customize the Photos app
- Filter and sort the photo library
- Back up and sync your photos with iCloud
- Delete or hide photos and videos
- Search for photos and videos
- Get wallpaper suggestions
- Make stickers from your photos
- Duplicate and copy photos and videos
- Merge duplicate photos and videos
- Import and export photos and videos
- Print photos
-
- Find podcasts
- Listen to podcasts
- View podcast transcripts
- Follow your favorite podcasts
- Use the Podcasts widget
- Select your favorite Podcasts categories and channels
- Organize your podcast library
- Download, save, remove, and share podcasts
- Subscribe to podcasts
- Listen to subscriber-only content
- Change download settings
-
- Browse the web
- Search for websites
- See highlights
- Customize your Safari settings
- Change the layout
- Create multiple Safari profiles
- Use Siri to listen to a webpage
- Bookmark a website
- Save pages to a Reading List
- Find links shared with you
- Download a PDF
- Annotate and save a webpage as a PDF
- Automatically fill in forms
- Get extensions
- Clear your cache and cookies
- Enable cookies
- Shortcuts
- Tips
-
- Intro to Apple Intelligence
- Find the right words with Writing Tools
- Create original images with Image Playground
- Create your own emoji with Genmoji
- Use Image Wand with Apple Intelligence
- Use Apple Intelligence with Siri
- Use visual intelligence
- Summarize notifications and reduce interruptions
- Use ChatGPT with Apple Intelligence
- Apple Intelligence and privacy
- Block access to Apple Intelligence features
-
- Get started with Screen Time
- Protect your vision health with Screen Distance
- Create, manage, and keep track of a Screen Time passcode
- Set schedules with Screen Time
- Block apps, app downloads, websites, and purchases
- Block calls and messages with Screen Time
- Check for sensitive images and videos
- Set up Screen Time for a family member
-
- Intro to Continuity
- Use AirDrop to send items to nearby devices
- Hand off tasks between devices
- Control your iPhone from your Mac
- Copy and paste between devices
- Stream video and audio from your iPhone
- Allow phone calls and text messages on your iPad and Mac
- Share your internet connection
- Use iPhone as a webcam
- Insert sketches, photos, and scans on Mac
- Start SharePlay instantly
- Connect iPhone and your computer with a cable
- Transfer files between devices
-
- Intro to CarPlay
- Connect to CarPlay
- Use Siri
- Use your vehicle’s built-in controls
- Get turn-by-turn directions
- Report traffic incidents
- Change the map view
- Make phone calls
- Play music
- View your calendar
- Send and receive text messages
- Announce incoming text messages
- Play podcasts
- Play audiobooks
- Listen to news stories
- Control your home
- Use other apps with CarPlay
- Rearrange icons on CarPlay Home
- Change settings in CarPlay
-
- Get started with accessibility features
- Use accessibility features during setup
- Change Siri accessibility settings
- Quickly turn accessibility features on or off
-
- Overview of accessibility features for vision
- Zoom in
- View a larger version of text you’re reading or typing
- Change display colors
- Make text easier to read
- Reduce onscreen motion
- Use iPhone more comfortably while riding in a vehicle
- Customize per-app visual settings
- Hear what’s on the screen or typed
- Hear audio descriptions
- Adjust CarPlay settings
-
- Turn on and practice VoiceOver
- Change your VoiceOver settings
- Use VoiceOver gestures
- Operate iPhone when VoiceOver is on
- Control VoiceOver using the rotor
- Use the onscreen keyboard
- Write with your finger
- Keep the screen off
- Use VoiceOver with an external keyboard
- Use a braille display
- Type braille on the screen
- Customize gestures and keyboard shortcuts
- Use VoiceOver with a pointer device
- Get live descriptions of your surroundings
- Use VoiceOver in apps
-
- Overview of accessibility features for mobility
- Use AssistiveTouch
- Adjust how iPhone responds to your touch
- Back tap
- Use Reachability
- Auto-answer calls
- Turn off vibration
- Change Face ID and attention settings
- Use Voice Control
- Use Voice Control commands with CarPlay
- Adjust the side or Home button
- Adjust Camera Control settings
- Use Apple TV Remote buttons
- Adjust pointer settings
- Adjust keyboard settings
- Control iPhone with an external keyboard
- Adjust AirPods settings
- Turn on Apple Watch Mirroring
- Control a nearby Apple device
- Control iPhone with the movement of your eyes
-
- Overview of accessibility features for hearing
- Use hearing devices
- Use Live Listen
- Use sound recognition
- Set up and use RTT and TTY
- Flash the indicator light for notifications
- Adjust audio settings
- Play background sounds
- Display subtitles and captions
- Show transcriptions for Intercom messages
- Get live captions of spoken audio
- Play music as taps, textures, and more
- Get notified about car horns and sirens in CarPlay
-
- Control what you share
- Turn on Lock Screen features
- Keep your Apple Account secure
- Create and manage Hide My Email addresses
- Protect your web browsing with iCloud Private Relay
- Use a private network address
- Use Advanced Data Protection
- Use Lockdown Mode
- Use Stolen Device Protection
- Receive warnings about sensitive content
- Use Contact Key Verification
-
- Important safety information
- Important handling information
- Find more resources for software and service
- FCC compliance statement
- ISED Canada compliance statement
- Ultra Wideband information
- Class 1 Laser information
- Apple and the environment
- Disposal and recycling information
- Unauthorized modification of iOS
- Copyright and trademarks
Save walks or hikes in Maps on iPhone
You can customize a walking path to plan a hike, an exercise route, or a city tour. In U.S. national parks, you can browse hikes and filter them by length, elevation, and route type. You can also save the routes—along with any notes you add—to access when you’re offline.
Note: Availability may vary by country or region.
Create your own walking or hiking route
Go to the Maps app
 on your iPhone.
To select a starting point on the map, touch and hold any road, path, trail, or other place accessible by walking to drop a pin, tap More
 , then tap Create a Custom Route.
Tap other points along your route to choose a path, then tap Out & Back or Close Loop to complete your route.
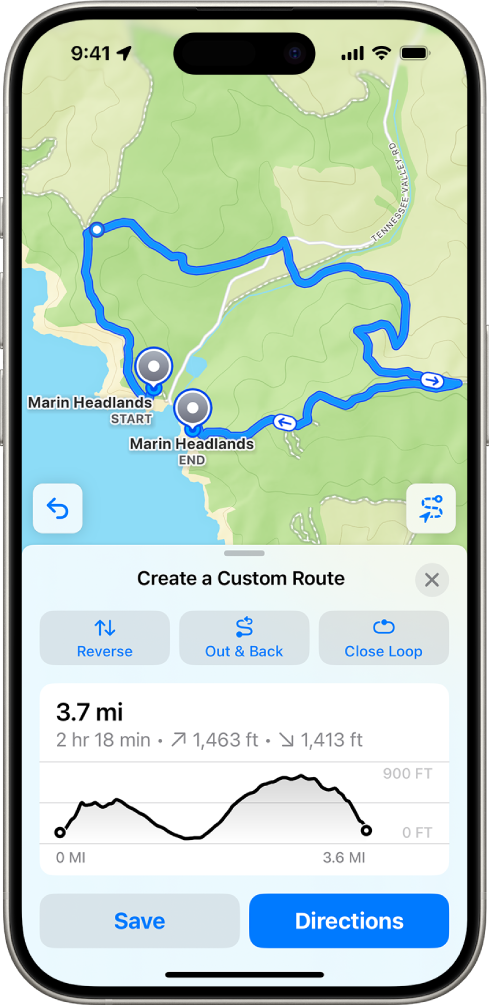
Do one of the following:
Navigate to the starting point: Tap Directions (available near the start of the route).
Start turn-by-turn walking directions: Tap Go (available if you’re not near the route).
Save the route for later: Tap Save, name the route and add notes (optional), then tap Done.
Tip: Make sure Download Route is turned on if you want to access the route and the surrounding map even when you don’t have access to an internet connection.
Browse and save hikes
You need to be online to search for hikes.
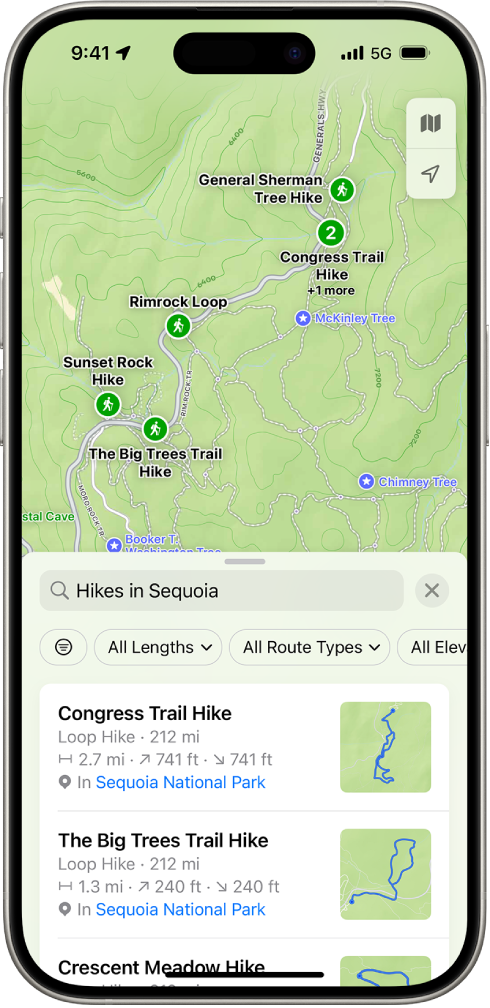
Go to the Maps app
on your iPhone.Make sure you’re in the Explore map, indicated by
 at the top right of your map. See Switch to a different map view.
Search for “hikes in [national park name],” then tap the search result.
To narrow down your choices, tap the filters—such as All Lengths or All Route Types. Swipe to see more options.
Tap to open the hike, tap Add to Library, name the hike and add notes (optional), then tap Done.
You can also do one of the following instead of saving the hike to your library:
If you’re near the start of the route: Tap Directions if you want to navigate to the trailhead.
If you’re not near the route: Tap Go to start turn-by-turn walking directions.
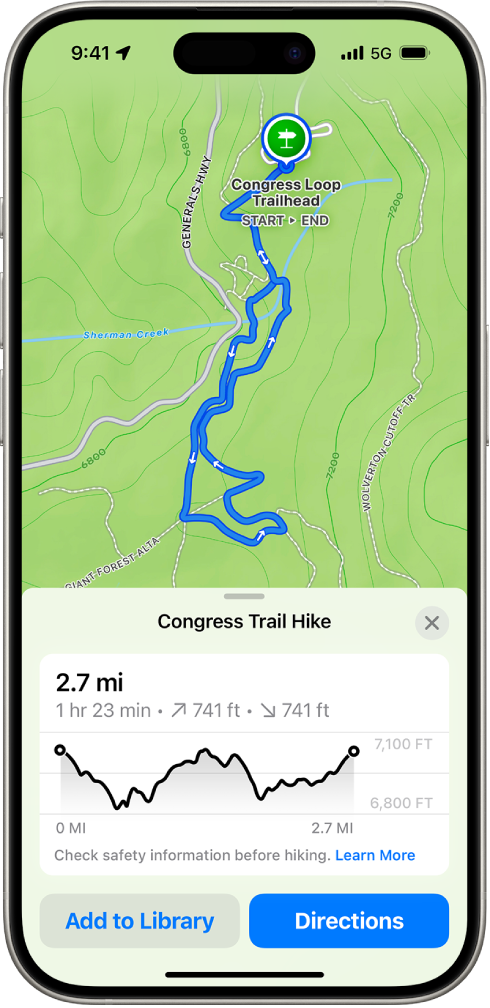
Tip: Make sure Download Route is turned on if you want to access the route and the surrounding map on your iPhone when you don’t have access to an internet connection.